
disaster recovery (DR)
What is disaster recovery (DR)?
Disaster recovery (DR) is an organization's ability to respond to and recover from an event that negatively affects business operations. The goal of DR is to reduce downtime, data loss and operational disruptions while maintaining business continuity. To prepare for this, organizations often perform an in-depth analysis of their systems and IT infrastructure and create a formal document to follow in times of crisis. This document is known as a disaster recovery plan.
What is a disaster?
The practice of DR revolves around events that are serious in nature. These events are often thought of in terms of natural disasters, but they can also be caused by systems or technical failure, human errors, or intentional attacks. These events are significant enough to disrupt or completely stop critical business operations for a period of time. Types of disasters include the following:
- Cyberattacks such as malware, distributed denial-of-service and ransomware attacks.
- Sabotage.
- Power outages.
- Hardware failures.
- Equipment failures.
- Epidemics or pandemics, such as COVID-19.
- Terrorist attacks or threats.
- Industrial accidents.
- Hurricanes.
- Tornadoes.
- Earthquakes.
- Floods.
- Fires.
Why is disaster recovery important?
Disasters can inflict damage with varying levels of severity, depending on the scenario. A brief network outage could result in frustrated customers and some loss of business to an e-commerce system. A hurricane or tornado could destroy an entire manufacturing facility, data center or office.
An effective disaster recovery plan lets organizations respond promptly to disruptive events, offering the following benefits in return:
- Business continuity. Disasters can significantly harm business operations, incurring costs and disrupting productivity. A DR plan enables automation and the swift restart of backup systems and data, ensuring a prompt resumption of scheduled operations.
- Cost reduction. The monetary costs of disasters and outages can be significant. According to results from Uptime Institute's "Annual Outage Analysis 2023" survey, 25% of respondents reported in 2022 that their latest outage incurred more than $1 million in direct and indirect costs, indicating a consistent upward trend in expenses. In addition, 45% reported that the cost of their most recent outage ranged between $100,000 and $1 million. With disaster recovery procedures in place, companies can get back on their feet quickly after outages, reducing recovery and operational costs.
- Help with compliance regulations. Many businesses are required to create and follow plans for disaster recovery, business continuity and data protection to meet compliance regulations. This is particularly important for organizations operating in the financial, healthcare, manufacturing and government sectors. Failure to have DR procedures in place can result in legal or regulatory penalties, so understanding how to comply with resilience standards is important.
- System security. A business can reduce the detrimental effects of ransomware, malware and other security threats by incorporating data protection, backup and restoration procedures into a disaster recovery plan. For instance, several built-in security mechanisms in cloud data backups can minimize questionable activity before it affects the company.
- Improved customer retention. When a disaster strikes, customer confidence in an organization's security and services can be questioned and easily lost. A solid disaster recovery plan, including employee training for handling inquiries, can boost customer assurance by demonstrating that the company is prepared for any disaster.
- Emergency preparedness. Thinking about disasters before they happen and creating a response plan can provide many benefits. It raises awareness about potential disruptions and helps an organization to prioritize its mission-critical functions. It also provides a forum for discussing these topics and making careful decisions about how to best respond in a low-pressure setting. While preparing for every potential disaster might seem extreme, the COVID-19 pandemic illustrated that even scenarios that seem farfetched can happen. For example, businesses with emergency measures to support remote work had a clear advantage over other companies when stay-at-home orders were enacted during the pandemic.
DR initiatives are more attainable by businesses of all sizes today due to widespread cloud adoption and the high availability of virtualization technologies that make backup and replication easier. However, much of the terminology and best practices developed for DR were based on enterprise efforts to re-create large-scale physical data centers. This involved plans to transfer, or fail over, workloads from a primary data center to a secondary location or DR site to restore data and operations.
What is the difference between disaster recovery and business continuity?
On a practical level, DR and business continuity are often combined into a single corporate initiative and even abbreviated together as BCDR, but they aren't the same thing. While the two disciplines have similar goals relating to an organization's resilience, they differ greatly in scope.
BC is a proactive discipline intended to minimize risk and help ensure the business can continue to deliver its products and services no matter the circumstances. It focuses especially on how employees continue to work and how the business continues operations while a disaster is occurring. BC is also closely related to business resilience, crisis management and risk management, but each of these disciplines has different goals and parameters.
DR is a subset of business continuity that focuses on the IT systems that enable business functions. It addresses the specific steps an organization must take to resume technology operations following an event. DR is also a reactive process by nature. While planning for it must be done in advance, DR activity isn't kicked off until a disaster actually occurs.
Elements of a disaster recovery strategy
Organizations should consider several factors while developing a disaster recovery strategy. Common elements of a DR strategy include the following:
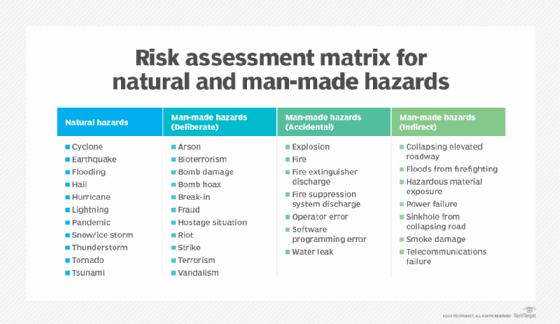
Risk analysis
Risk analysis or risk assessment is an evaluation of all the potential risks the business could face, as well as their outcomes. Risks can vary greatly depending on the industry the organization is in and its geographic location. The assessment should identify potential hazards, determine whom or what these hazards would harm, and use the findings to create procedures that take these risks into account.
Business impact analysis
A business impact analysis (BIA) evaluates the effects of the identified risks on business operations. A BIA can help predict and quantify costs, both financial and nonfinancial. It also examines the effects of different disasters on an organization's safety, finances, marketing, business reputation, legal compliance and quality assurance.
Understanding the difference between risk analysis and BIA and conducting the assessments can also help an organization define its goals when it comes to data protection and the need for backup. Organizations generally quantify these using measurements called recovery point objective (RPO) and recovery time objective (RTO).
- Recovery point objective. RPO is the maximum age of files that an organization must recover from backup storage for normal operations to resume after a disaster. The RPO determines the minimum frequency of backups. For example, if an organization has an RPO of four hours, the system must back up at least every four hours.
- Recovery time objective. RTO refers to the amount of time an organization estimates its systems can be down without causing significant or irreparable damage to the business. In some cases, applications can be down for several days without severe consequences. In others, seconds can do substantial harm to the business.
RPO and RTO are both important elements in disaster recovery, but the metrics have different uses. RPO is acted on before a disruptive event takes place to ensure data is backed up, while RTO comes into play after an event occurs.
Incident response
This encompasses detecting, containing, analyzing and resolving a disruptive event. Incident response includes activating the disaster recovery plan, evaluating the incident's scope and effect, executing the recovery strategy, restoring normal operations and deactivating the plan. To maintain accountability and promote ongoing improvement, it's also essential to record and report incident response actions and results.
The components of a DR strategy can vary depending on the size, industry and particular demands of an organization. Therefore, these plans should be customized to meet the unique requirements of each business.
What's in a disaster recovery plan?
Once an organization has thoroughly reviewed its risk factors, recovery goals and technology environment, it can write a disaster recovery plan. The DR plan is the formal document that specifies these elements and outlines how the organization will respond when disruption or disaster occurs. The plan details recovery goals including RTO and RPO, as well as the steps the organization will take to minimize the effects of the disaster.
The components of a DR plan should include the following:
- A DR policy statement, plan overview and main goals of the plan.
- Key personnel and DR team contact information.
- A risk assessment and BIA to identify potential threats, vulnerabilities and negative effects on business.
- An updated IT inventory that includes details on hardware, software assets and essential cloud computing services, specifying their business-critical status and ownership, such as owned, leased or utilized as a service.
- A step-by-step description of disaster response actions immediately following an incident.
- A diagram of the entire network and recovery site.
- Directions for how to reach the recovery site.
- A list of software and systems that staff will use in the recovery.
- Sample templates for a variety of technology recoveries, including technical documentation from vendors.
- A communication that includes internal and external contacts, as well as a boilerplate for dealing with the media.
- A summary of insurance coverage.
- Proposed actions for dealing with financial and legal issues.
An organization should consider its DR plan a living document. It should schedule regular disaster recovery testing to ensure the plan is accurate and will work when a recovery is required. The plan should also be evaluated against consistent criteria whenever there are changes in the business or IT systems that could affect disaster recovery.
Disaster recovery sites
An organization uses a DR site to recover and restore its data, technology infrastructure and operations when its primary data center is unavailable. DR sites can be internal, external or cloud-based.
An organization sets up and maintains an internal DR site. Organizations with large information requirements and aggressive RTOs are more likely to use an internal DR site, which is typically a second data center. When building an internal site, the business must consider hardware configuration, supporting equipment, power maintenance, heating and cooling of the site, layout design, location and staff.
An external disaster recovery site is owned and operated by a third-party provider. External sites can be hot, warm or cold.
- Hot site. A fully functional data center with hardware and software, personnel, and customer data, which is typically staffed around the clock and operationally ready in the event of a disaster.
- Warm site. An equipped data center that doesn't have customer data. An organization can install additional equipment and introduce customer data following a disaster.
- Cold site. Has infrastructure to support IT systems and data, but no technology until an organization activates DR plans and installs equipment. They are sometimes used to supplement hot and warm sites during a long-term disaster.
A cloud-based disaster recovery site is another option. An organization should consider site proximity, internal and external resources, operational risks, service-level agreements (SLAs) and cost when contracting with cloud providers to host their DR assets or outsourcing additional services.
Disaster recovery tiers
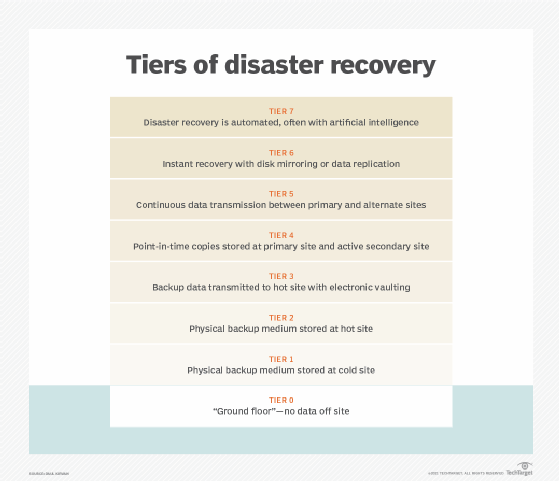
In addition to choosing the most appropriate DR site, it can be helpful for organizations to consult the tiers of disaster recovery identified by the Share Technical Steering Committee and IBM in the 1980s. The tiers feature a variety of recovery options organizations can use as a blueprint to help determine the best DR approach depending on their business needs.
The recognized disaster recovery tiers include the following:
- Tier 0. This tier denotes the lowest preparedness level and is usually associated with companies without disaster recovery or off-site data backups. Because recovery in this tier is entirely dependent on on-site technologies, recovery times can be unpredictable.
- Tier 1. This level consists of cold sites that provide basic infrastructure but lack preinstalled systems. Businesses in this category have data backups, but recovery involves manual intervention and hardware configuration, which lengthens recovery times.
- Tier 2. This tier improves upon Tier 1 with the addition of a warm site. Unlike cold sites, warm sites are disaster recovery locations that have hardware and infrastructure already set up to facilitate faster recovery times. There can still be a need for additional setup and configuration.
- Tier 3. By electronically vaulting mission-critical data, Tier 3 options improve upon the capabilities of Tier 2. Electronic vaulting of data involves electronically transferring data to a backup site, in contrast to the traditional method of physically shipping backup tapes or disks. After a disaster, there's less chance of data loss or re-creation because the electronically vaulted data is usually more recent than data sent through conventional means.
- Tier 4. This tier includes a hot site, which is a DR site that's fully functioning and ready to use. Hot sites replicate the primary data center's systems and operations in real time, enabling quick failover and minimal downtime. They provide the maximum availability and recovery speed, but they're also the most expensive alternative.
- Tier 5. Tier 5 often implies advanced disaster recovery capabilities beyond a hot site. This can include capabilities such as real-time data replication, automated failover, and enhanced monitoring and administration tools.
- Tier 6. Tier 6 disaster recovery capabilities are comparable to Tier 5's, but they often include even more sophisticated technology and techniques for rapid recovery and minimal data loss.
- Tier 7. Tier 7 is a highly advanced level of disaster recovery capability. At this level, artificial intelligence and automation are likely to play a key part in the recovery process.
Another type of DR tiering involves assigning levels of importance to different types of data and applications, and treating each tier differently based on the tolerance for data loss. This approach recognizes that some mission-critical functions might not be able to tolerate any data loss or downtime, while others can be offline for longer or have smaller sets of data restored.
Types of disaster recovery
In addition to choosing a DR site and considering DR tiers, IT and business leaders must evaluate the best way to put their DR plan into action. This will depend on the IT environment and the technology the business chooses to support its DR strategy.
Types of disaster recovery can vary, based on the IT infrastructure and assets that need protection, as well as the method of backup and recovery the organization decides to use. Depending on the size and scope of the organization, it might have separate DR plans and response and resilience teams specific to different departments.
Major types of DR include the following:
- Data center disaster recovery. Organizations that house their own data centers must have a DR strategy that considers all the IT infrastructure within the data center as well as the physical facility. Backup to a failover site at a secondary data center or a colocation facility is often a large part of the plan. IT and business leaders should also document and make alternative arrangements for a wide range of facilities-related components, including power systems, heating and cooling, fire safety, and physical security.
- Network disaster recovery. Network connectivity is essential for internal and external communication, data sharing, and application access during a disaster. A network DR strategy must provide a plan for restoring network services, especially in terms of access to backup sites and data.
- Virtualized disaster recovery. Virtualization provides disaster recovery by letting organizations replicate workloads in an alternate location or the cloud. The benefits of virtual DR include flexibility, ease of deployment, efficiency and speed. Since virtualized workloads have a small IT footprint, replication can be done frequently, and failover can be initiated quickly.
- Cloud disaster recovery. The widespread acceptance of cloud services lets organizations, typically reliant on alternate or on-premises DR locations, host their disaster recovery in the cloud. Cloud DR goes beyond simple backup to the cloud. It requires an IT team to set up automatic failover of workloads to a public cloud platform in the event of a disruption.
- Disaster recovery as a service (DRaaS). DRaaS is the commercially available version of cloud DR. In DRaaS, a third party provides replication and hosting of an organization's physical and virtual machines. The provider assumes responsibility for deploying the DR plan when a crisis arises, based on an SLA.
Disaster recovery services and vendors
Disaster recovery providers can take many forms, as DR is more than just an IT issue, and business continuity affects the entire organization. DR vendors include those selling backup and recovery software, as well as those offering hosted or managed services. Because disaster recovery is also an element of organizational risk management, some vendors couple it with other aspects of security planning, such as incident response and emergency planning.
Examples of options for DR services and vendors include the following:
- Backup and data protection platforms.
- DRaaS providers.
- Add-on services from data center and colocation providers.
- Infrastructure-as-a-service providers.
Choosing the best option for an organization ultimately depends on top-level business continuity plans and data protection goals, as well as which option best meets those needs and budgetary goals.
Examples of DR software and DRaaS providers include the following:
- Acronis Cyber Protect Cloud.
- Carbonite Disaster Recovery.
- Dell EMC RecoverPoint.
- Druva Data Resiliency Cloud.
- IBM SmartCloud Virtualized Server Recovery.
- Microsoft Azure Site Recovery.
- Unitrends Backup and Recovery.
- Veeam Replication and DRaaS.
- VMware Cloud Disaster Recovery.
- Zerto.
Emergency communication vendors are also a key part of the disaster recovery process, as they help keep employees informed during a crisis by sending them notifications and communications. Examples of vendors and their systems include AlertMedia, BlackBerry AtHoc, Cisco Emergency Responder, Everbridge Crisis Management and Rave Alert.
Download a free SLA template for use with disaster recovery products and services.
While some organizations might find it challenging to invest in comprehensive disaster recovery planning, none can afford to ignore the concept when planning for long-term growth and sustainability. In addition, if the worst were to happen, organizations that have prioritized DR would experience less downtime and be able to resume normal operations faster.
Businesses often prepare for minor disruptions, but it's easy to overlook larger and more intricate disasters. Examine the top scenarios for IT disasters that disaster recovery teams should test vigorously.